July 28th, 2011
The I Spy Bag
So... I have this thing (which I so genetically passed on to my daughter) with little things. Like... my whole life, I just am drawn to tiny miniature things, and details! Oh I love details. So I had been collecting a few tiny items (we're talking less than an inch big) that I was trying to figure out what to do with. I saw at this store, in the Children's Museum, a bag, with a plastic window, and inside there were... toys or buttons, that you could find! I thought that it was amaaaaaziiiiing - but not amazing enough for me to spend $20 on.
Instead, I vowed to one day make my own. (One year laterrr...) I was looking in my jewelry box, and saw a tiny key. Aha! I didn't think I had that many little things... but for kicks, maybe I should round them all up together and find out.
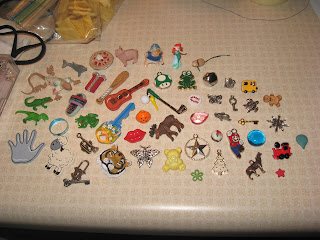
I had FIFTY-ONE little charms. Yes. Yes I think I have enough.
There were some I had made (like a clay pie, and cupcake), things I had altered (like a lizard I had sewn a sweater on, and a plastic baby I had sewn clothes and a hat onto), things I had collected (a little mermaid from an ex-boyfriend, keys, buttons, my very first house key, a sandal that fell off a barette that was mine when I was a little girl, buttons, charms, etc) and things that I bought for Eleanor to play with (little animals, etc)...
Off to Joann's, there was a vinyl scrap on sale in the scrap bin for just over $1. (Sold!)
I used some pink flannel that I already had, and for the other side I used a scrap of fabric from an old baby dress hand-me-down that had lived it's life, but had a super fun pattern on it.
I trimmed the front, totally lazily stitching the vinyl (wide stitches!), making sure the vinyl side was DOWN, and barely touching too... because if it catches... you are in big trouble. And your vinyl is full of holes. Yeah. Figured that out the hard way. ;o)
After stitching two sides of the vinyl to two strips of flannel, I attached the other sides of vinyl to more flannel, just laying it over top of the other edges and sewing a straight line. Hey, I'm not a sewer.
Wrong sides out, I stitched all the way around except for about a 2" opening. Then I turned it inside out.
I found these at Michael's - in the back aisle, by the "employees only" entrance - like it was secretly hidden... Apparently, this is very hard to find around here, since it took me FOREVER to locate them (JoAnn's and Hobby Lobby were totally out) - but voila! Polly pellets. Just what I need to fill my bag, and hide the charms/doo-hickys.
I dropped the charms and figurines and buttons etc into the opening in the bag, and then used a funnel to fill the bag with poly pellets. Not TOO full... as I later found out. (I emptied the whole bag in, because it filled it up with a little extra space, but then it was too hard to manipulate it around and find all the charms. It's ok because my daughter was mortified to see Ariel trapped inside, and I had to get her out anyways. ☺I ended up using just over half of the bag of poly pellets.)
Then I stitched the opening closed. Whatever that stitch is called where you go back and forth on the inside of the seam, to hide the stitches. :o)
I took a picture so I didn't have to explain it.
Ta-da! The bag, before I took some of the pellets out, was pretty heavy.
This is what my daugther saw, and then asked - with a very worried face - if I could 'save Ariel'... so I had to get her out, of course. I think this would have been more fun with around 20 charms instead of 50... but that is just my opinion. There are always 5 or more charms in the window instead of one or two, like the one I saw in the store... but it's still loved!
Of course, I want to take this to church - what a great quiet activity! - but I didn't want to toss it in the bag with everything else... (the loose snacks! the leaking juice! ahhhh!)...that can happen in the bag... because I don't want to think about how to clean it if that becomes an issue. SO.
I kept this packaging for my happiest-shower-curtain-on-earth, because it is sturdy vinyl with velcro button attachments on the inside.
I replaced the inside board paper with trimmed poster board, and put some stickers on the front cardboard part to read "I Spy"...
And now, it almost looks like I could have bought it. Instead of made it. The funny thing is... by the end of this, it cost just over $1 for the vinyl, about $1 for the posterboard, and about $6 for the poly pellets. Which is still less than the $20 they wanted, and I got to pick the charms I wanted in it.
Wuhoo!


No comments:
Post a Comment